Gettings started
Latest update: January 12, 2026
RoleCommerce: Documentation
1. Introduction
This is a quick documentation on how to set up everything from scratch: installing the plugin to full readiness for production and making money online with RoleCommerce.
RoleCommerce - A simple and powerful plugin that allows you to build a Membership Wesbite or Software as a Product (SaaS) WordPress websites with the most popular page builders while supporting Role Conditions. Here are a few of them: Elementor, Bricks Builder, Divi, Gutenberg, etc.
Available versions of the plugin:
Each plugin version has a different feature set to meet your business needs. The number of licenses can be increased for each version on demand. Currently, the number of license keys can be increased for the King version.
1.1 Installation
To launch your Membership Wesbite, you need to have 2 plugins: one version of the RoleCommerce plugin (Lite, Pro, or King, it doesn't matter) and a plugin to create new roles.
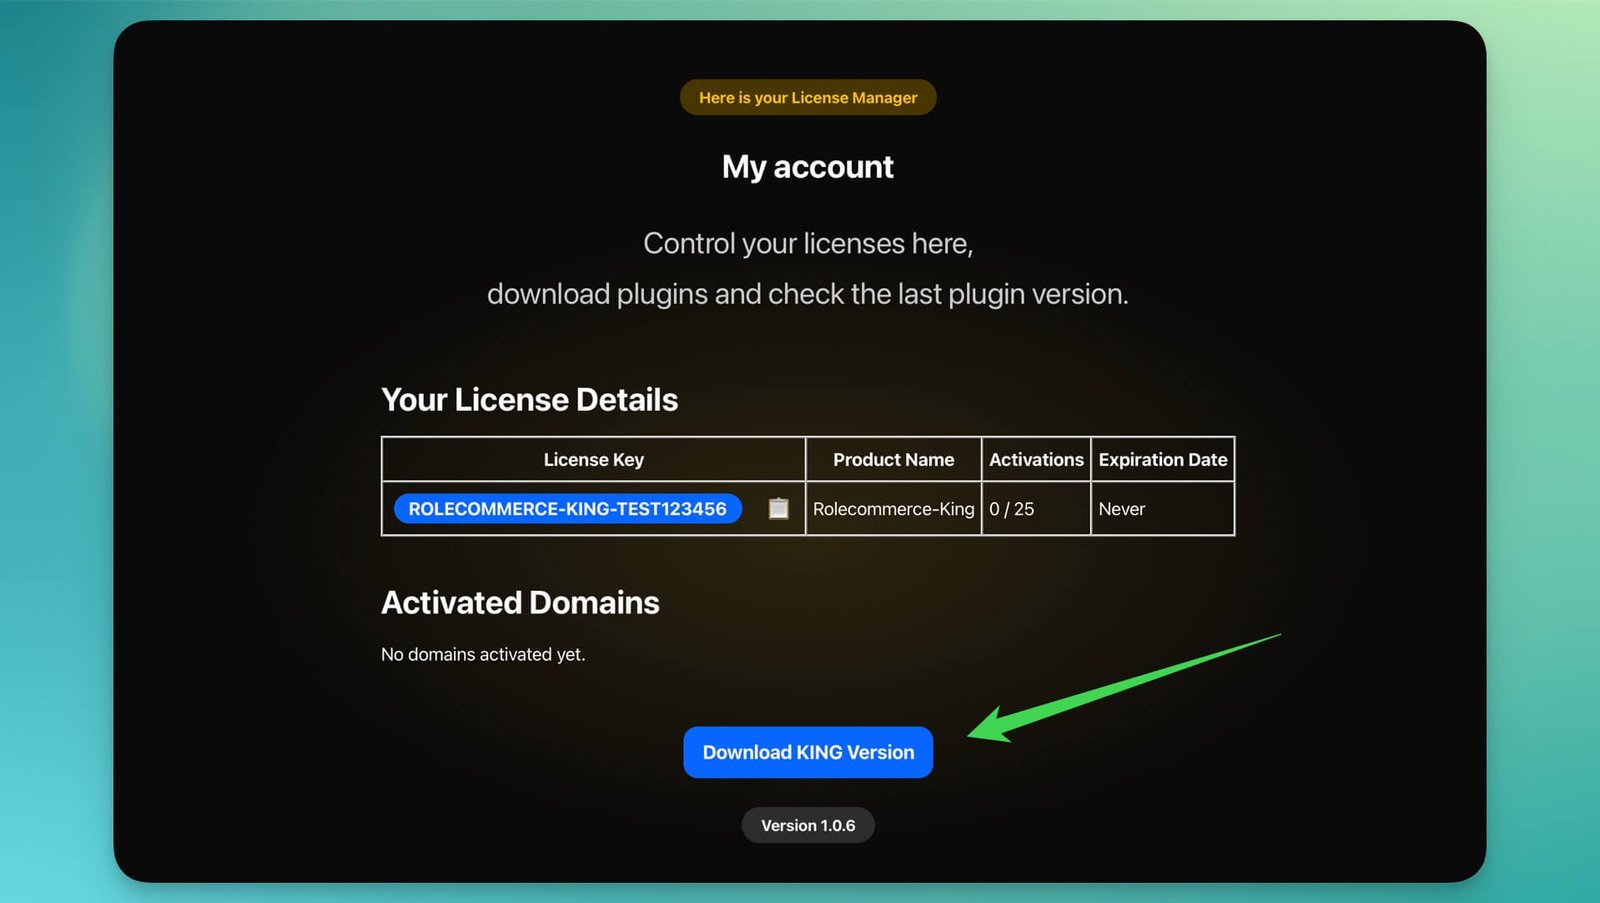
How to download RoleCommerce?
Once you've purchased the license, you can download the plugin. If not, purchase RoleCommerce plugin:
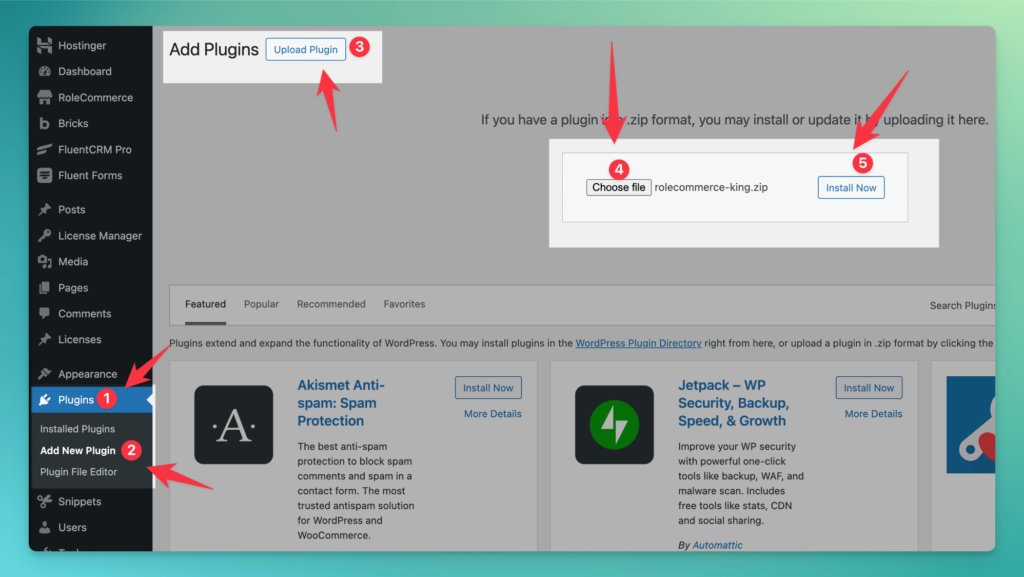
How to install RoleCommerce?
How to install User Role Editor?

1.2 Activate RoleCommerce
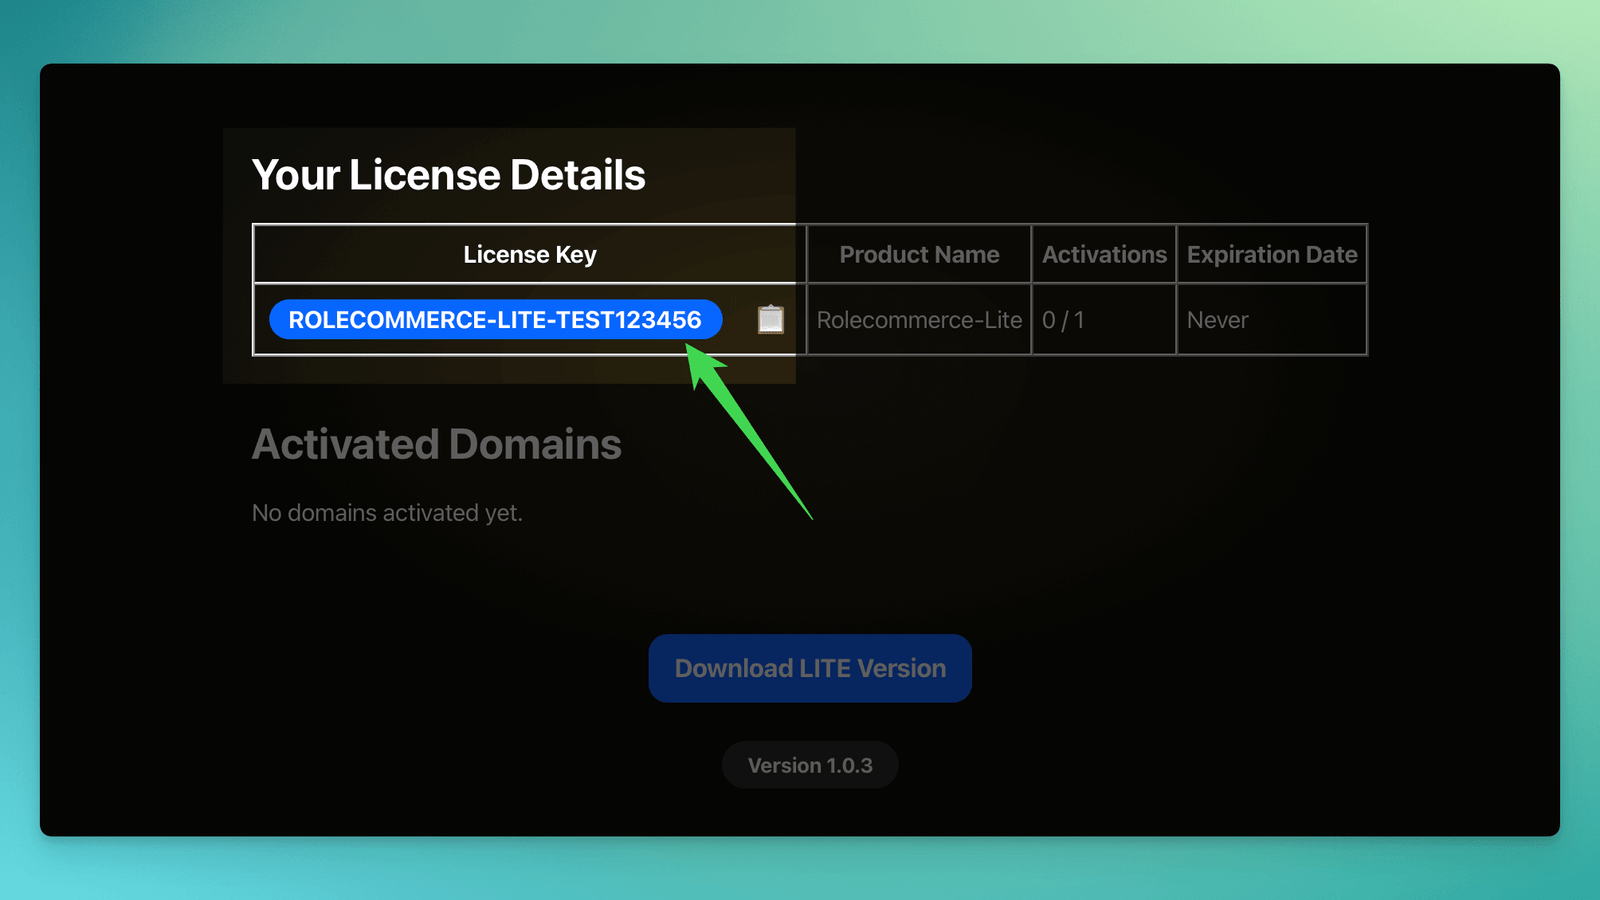
Once you've purchased the license, go to License manager. You're able to see all your license keys. Note: you can upgrade your account by having license keys for different plugin versions to balance your needs and expenses for your SaaS business. Copy the license key:
How to insert license?
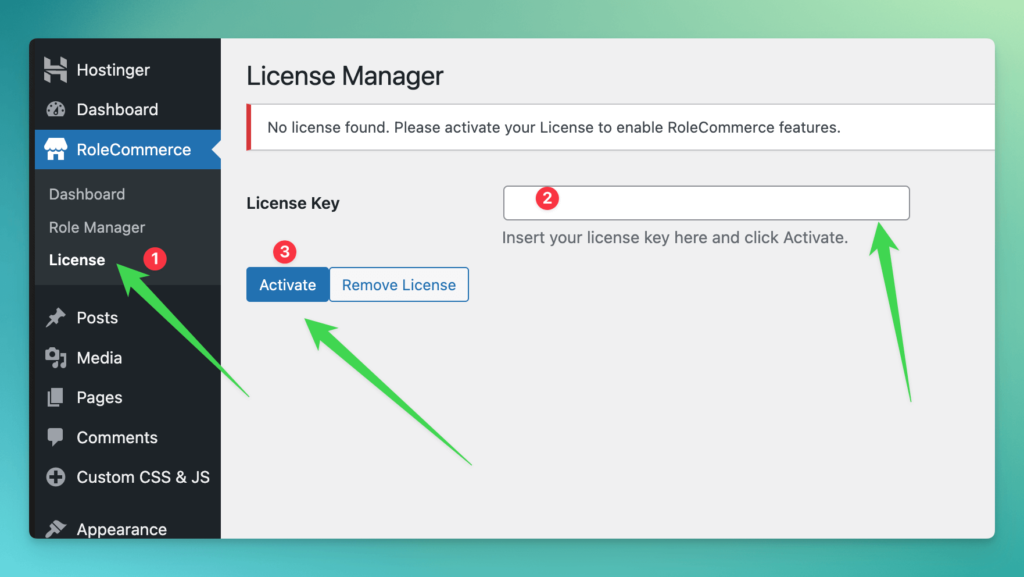
Once you've activated the license, the plugin is activated and you'll be able to see your domain in the list of activated domains on the License Manager page.
2. Create new roles
Before jumping into the details of the RoleCommerce plugin, it's important to have all roles created in your WordPress system. By default, there are subscribers, authors, etc. However, these may not fit your business needs.
We have to have at least 2 new roles:
Of course, you can have much more if you plan different levels of access. For example, in one of my projects, I have 13 roles, including different combinations: Pro users, Pro + Advanced users, etc. Just think about the roles you need for your potential business. Feel free to add more roles later.
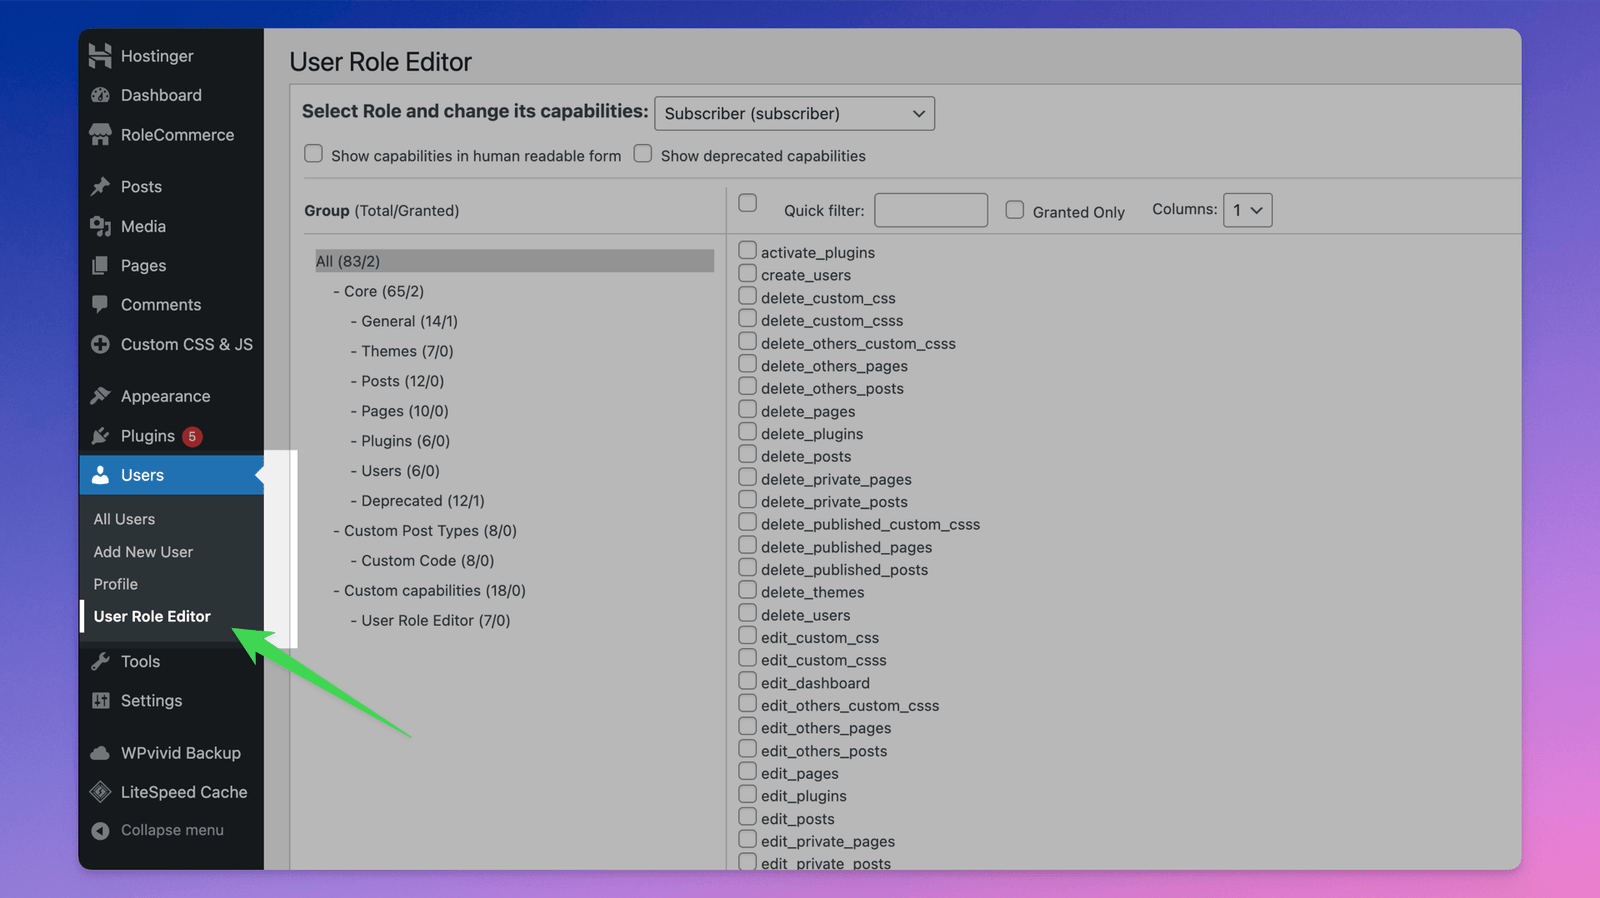
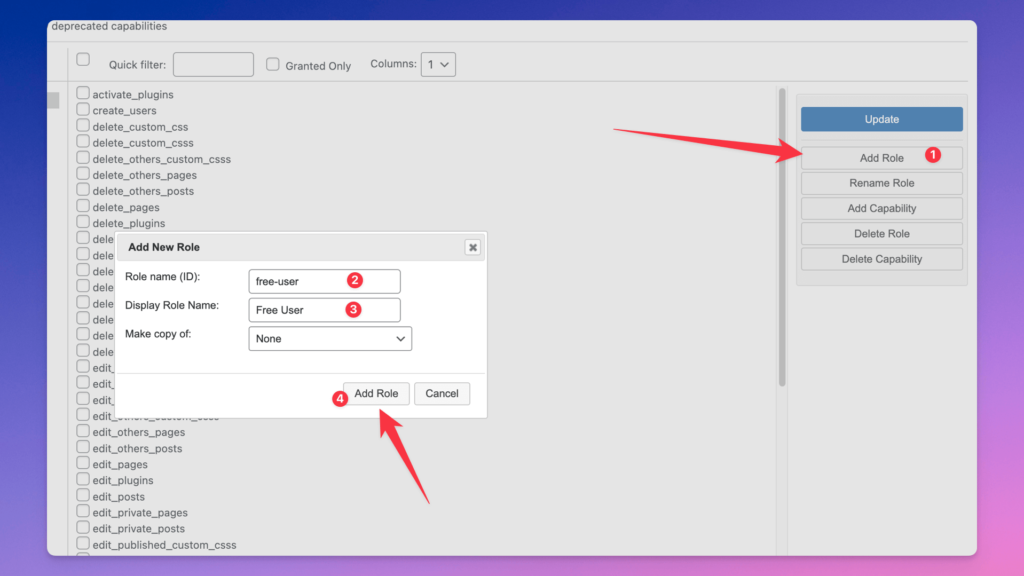
As an example, I work with an awesome 100% free plugin User Role Editor, which allows creating an unlimited number of roles with different capabilities and hiding the admin bar, which our users don't need at all.
How to create a new role in User Role Editor plugin?
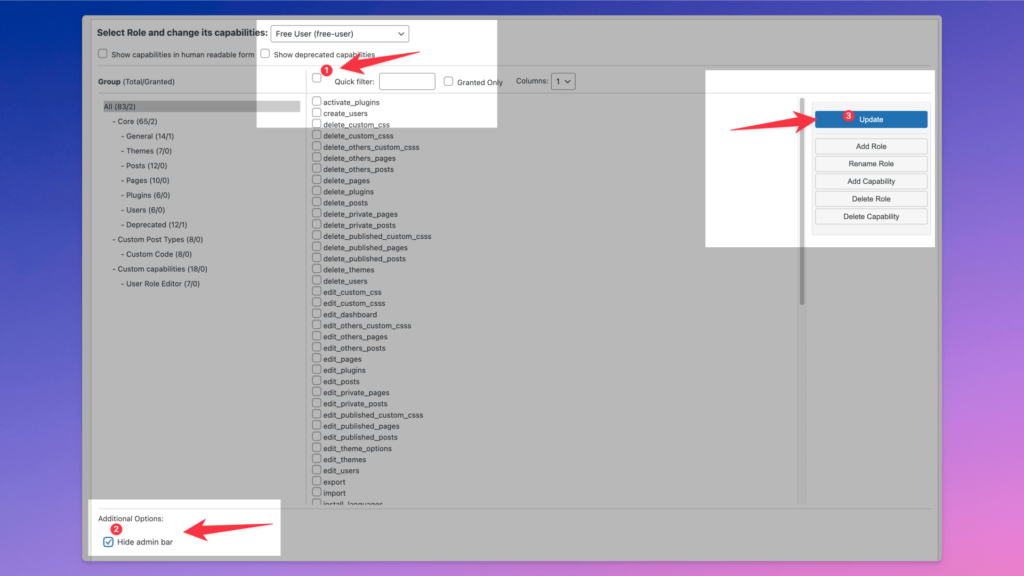
In this interface, you can create new roles, manage capabilities, and more. This screenshot shows how to create a role called "Free User".
The new role has been created! It's awesome! Let's check the permissions and the important checkbox 'Hide admin bar'. No permissions should be selected. Don't forget to enable the 'Hide admin bar' checkbox.
2.1 Set up default role
When the user has created an account, the default Subscriber role is assigned, which you don't need. Set up a default role 'Free user' or whatever you call this role, indicating that the user has created an account and hasn't purchased anything yet.
To set up new default role:
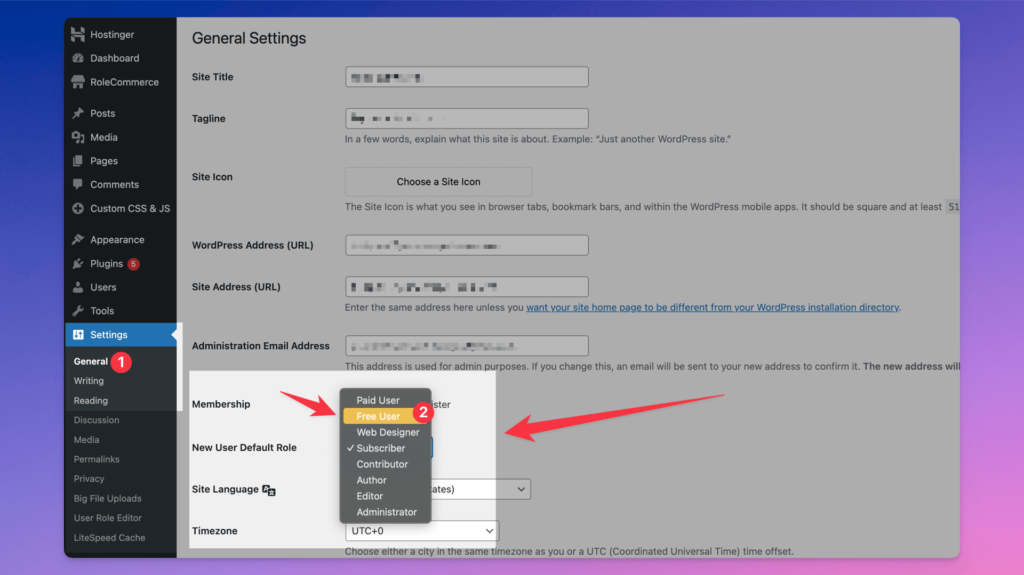
Incredible! Right now, a new role will be assigned to each new user!
3. Role Manager: settings
Role Manager page is the brain of the Rolecommerce plugin. Here you are able to set up a variety of settings, which we will check in a few seconds. In Role Manager, you can specify which roles can be changed, assign a revenue value to the "role changing," set up expiration links, generate secret keys, and more.
In Role manager you can:
Note: expiration links available starting from PRO version
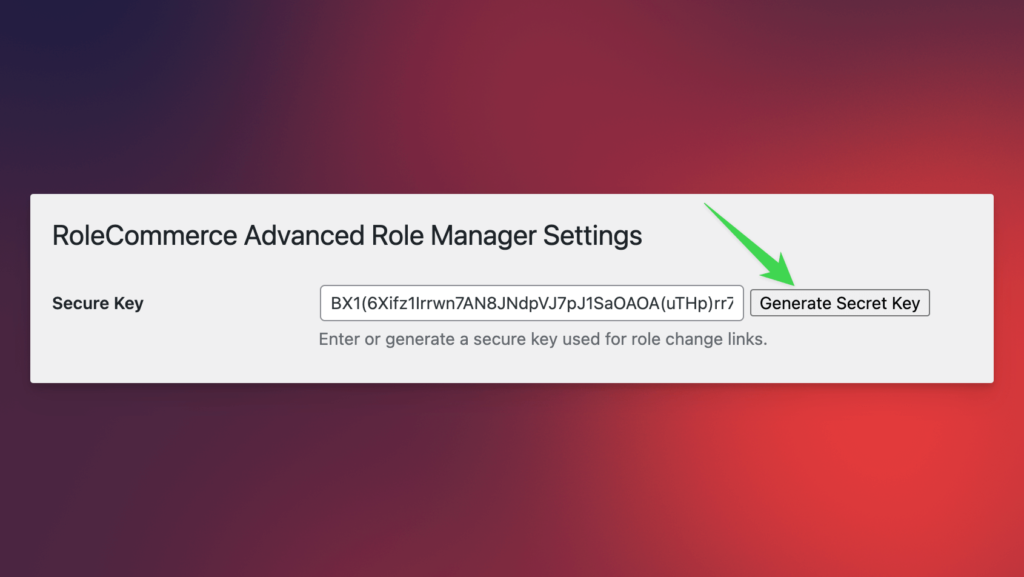
3.1 Generated Secret key
You can paste your own secret key or generate one with a button. This secret key is used as a parameter for a special link. Through the link with the generated secret key, the user's role will be changed.
3.2 URLs & Currency
These 3 fields are for setting up the URLs and currency. The currency symbol is clear: you set up your currency to track revenue on the RoleCommerce dashboard and at the user level.
Redirect URL - a URL to which a user will be redirected in a successful flow: the user role has been changed.
Failed Redirect URL - a URL to which a user will be redirected in the failed flow: the user role wasn't changed.

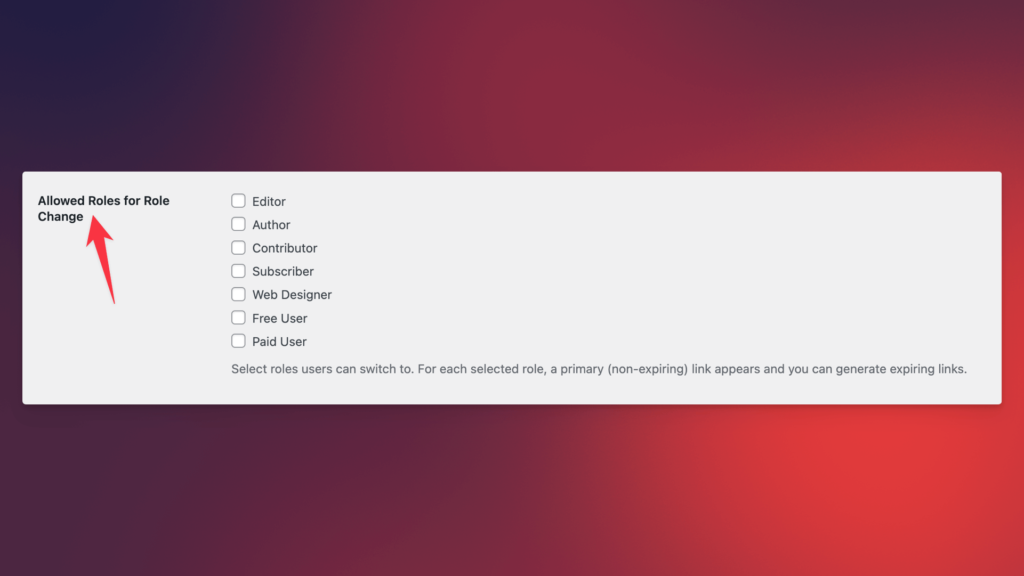
3.3 Roles to change
You can have multiple roles. To ensure your product is secure from within, there is no option to change the role to Administrator. You must select which roles are permitted to trigger changes.
Once you've selected the roles, click on the "Save Settings" button at the bottom of the page. After that, you will be able to see the settings for different parameters.
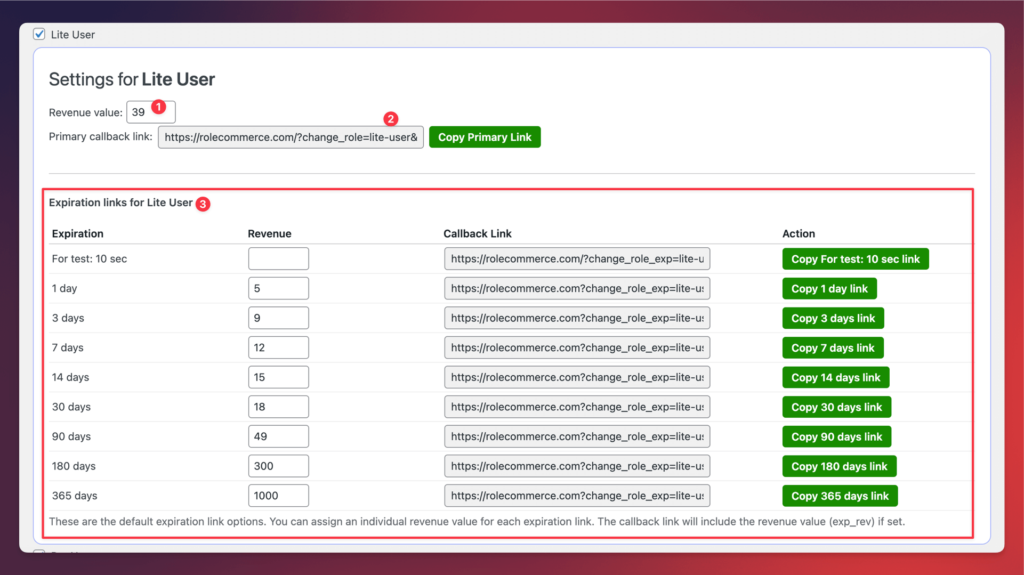
3.3.1 Links & Revenue & Expirations
After you select roles that can be triggered via the link for changes, a settings window appears for each individual role to set up revenue, generated change link, and a list of expiration links with their own revenue fields.
Note: expiration links available starting from PRO version
Primary link - user changes the role without expiration
Expiration link - After a period of time, the role will revert to the previous one.
Links logic is simple:
Note: Use these links as callback links or links that are hidden from the end-user. However, when they are redirected via this link, the role will change. No worries: the link with the secret key won't be stored in the browser history; a special extra redirect is implemented that erases the link with the secret key from the history.
Make sure you don't share this link publicly. No one should click on it because someone might share it with another person! In this case, if it gets leaked, regenerate the secret key and change the links everywhere.
3.3.1.1 Conditional Expiration links
Awesome expiration links which allow you building flexible logic. Available 4 options since 1.1.0 KING version:

End of current month - Doesn't matter which day of the month the user purchased access. Via this link, the specific user will have access until the end of the current month.
Example: User A changed roles on the 2nd of May; the access is until the 31st of May at 23:59:59. User B purchased on the 31st of May at 13:30:00. Still, he will have access until the end of the current month, the 31st of May at 23:59:59.
End of current year - the same logic as for month, but applied for period: year.
Example: User A changed roles on the 17st of June 2025; the access is until the 31st of Dec 2025 at 23:59:59. User B purchased on the 30st of Dec 2025 at 09:45:00. Still, he will have access until the end of the current year, the 31st of Dec 2025 at 23:59:59.
Conditional over month - This link contains the threshold date, which makes this link conditional. When the user changes roles BEFORE or ON the threshold date, the user has access until the end of the current month. When the user changes roles AFTER the threshold date, access will be until the end of the next month, so over the month.
Example: User A changed roles ON the 29th of April or BEFORE this date; the access is until the 30th of April at 23:59:59. User B changed roles AFTER the 29th of April; the access is until the 31st of May at 23:59:59 (over the next month).
Conditional over year - the same as for Conditional over month, but for year.
Example: User A changed roles ON the 21th of April or BEFORE this date; the access is until the 31st of Dec 2025 at 23:59:59. User B changed roles AFTER the 21th of April; the access is until the 31st of Dec 2026 (!) at 23:59:59 (over the next year).
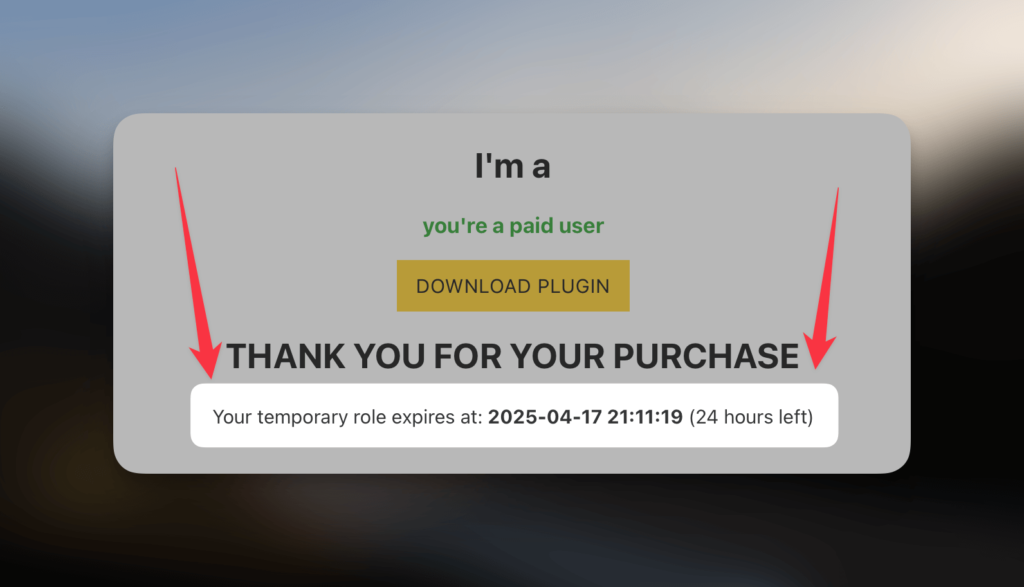
3.3.2 Display Expiration Time
If you're planning to sell temporary access that will expire, it makes sense to show this information to your paying customers:
Note: expiration links available starting from PRO version
Here is an example of how you can use PHP code to display the 'time left' parameter taken from the user level. You can copy this code:
<?php
if ( is_user_logged_in() ) {
    $current_user = wp_get_current_user();
    $expiration = get_user_meta( $current_user->ID, 'rolecommerce_role_expiration', true );

    if ( $expiration ) {
        if ( time() < intval( $expiration ) ) {
            $formatted_exp = date( 'Y-m-d H:i:s', intval( $expiration ) );
            $time_left     = human_time_diff( time(), intval( $expiration ) );
            echo '<p>Your temporary role expires at: <strong>' . esc_html($formatted_exp) . '</strong> (' . esc_html($time_left) . ' left)</p>';
        }
    }
}
?>
3.3.4 Manual Expiration date set up
It can be an option that you can set up a manual Expiration date for a specific user. Since version RoleCommerce King 1.2.2, it's possible to do this on the user level.

Note: expiration available starting from PRO version
4. Update, Deactivate & Delete plugin
This is a quick guide on best practices for what to do during plugin updates, deactivations, or uninstallation.
Deactivate before installing the new version of plugin - Before you install the new version, please deactivate or delete the previous one. The current implementation does not support automatic detection of new plugin versions.
Remove license before deleting plugin / project - try to maintain the 'clear list' of your active domains. Remove the license from the plugin if you understand you won't use it on this domain anymore. If you lost access to the website, you can deactivate the domain in your License Manager.
RoleCommerce: Features
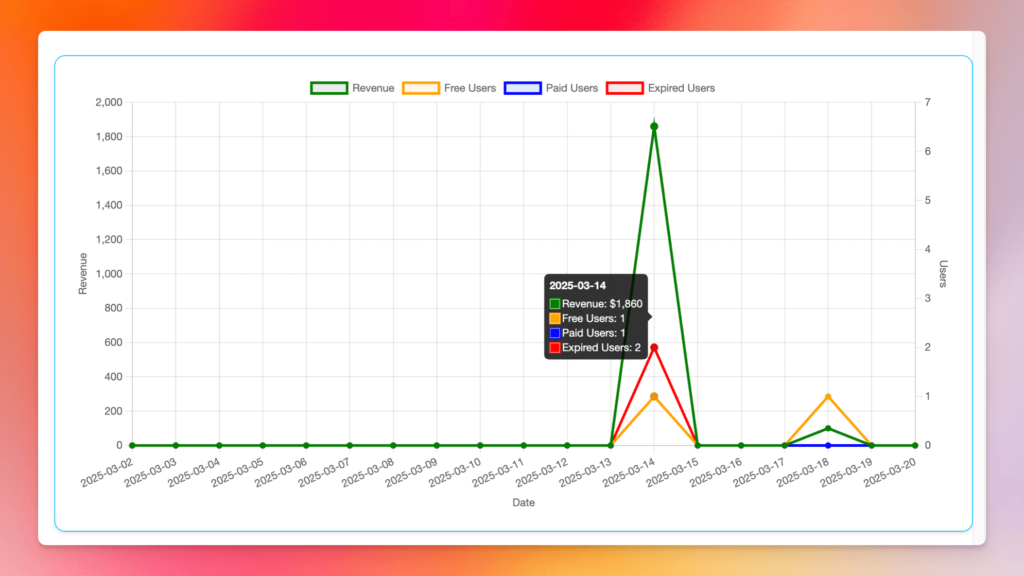
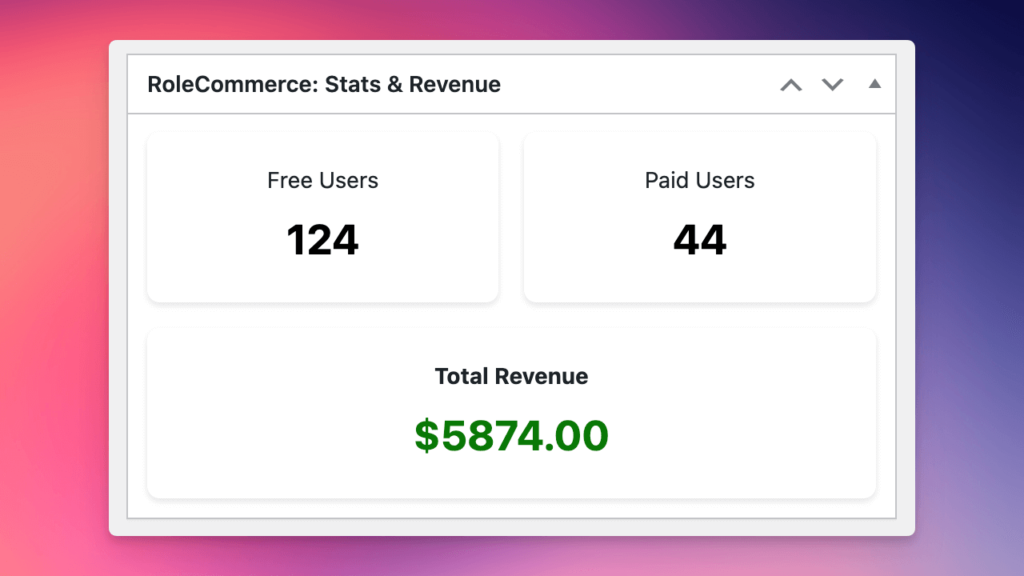
5. Dashboard
This is the main page where you can track all your free, paid, and expired users. For that, you use the dashboard graphs and tables. On this page, you see the statistics and data from your users: names, emails, user roles, and revenue per user. Additionally, on the dashboard page, you can see the statistics for downloads of secure files.
Note: expiration links available starting from PRO version
The graph includes a legend explaining what is displayed. You can check the statistics based on the date range, select or deselect users on the graph, and view revenue per day.
6. Secure downloads
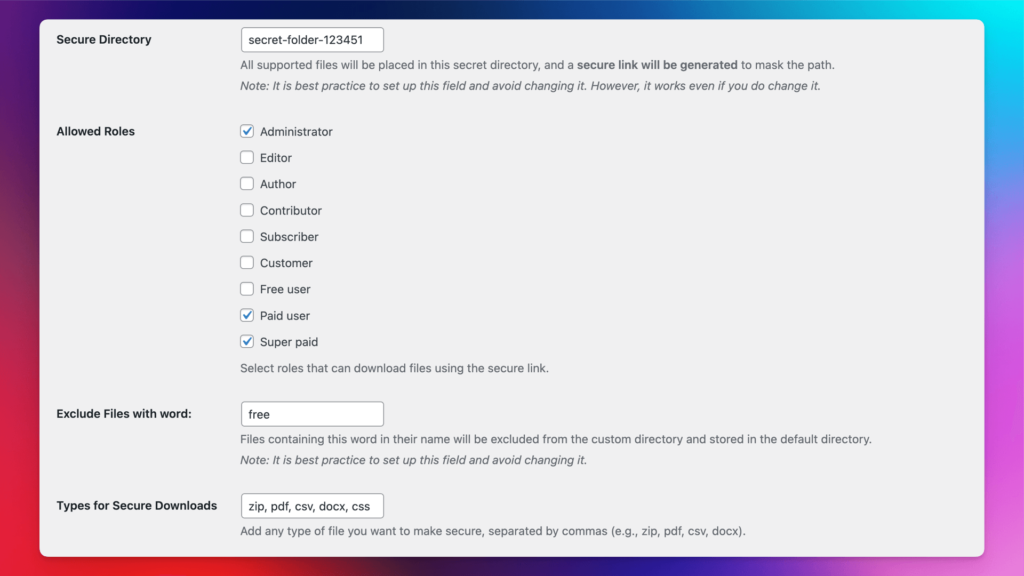
This is the page where you can set up permissions for user roles that can download your files from the WordPress Media directory. Once the plugin is active and you have uploaded some files in the specified formats, a secure link is generated to mask the real path to your file:
Note: secure downloads available starting from KING version
Secure Directory - create a path for the folder where your files will be located. These files won't be placed in the typical /wp-content/ folder.
Allowed Roles - select roles that can access files via the secure link.
Exclude Files with Word - a feature that allows for the exclusion of secure link generation. By default, the word is "free," but you can use whichever word you prefer. This means that all files containing the word "free" will be ignored by the security rule.
Types for Secure downloads - via commas, you can list the file formats that will trigger the secure link generation logic. By default, it's zip, pdf, csv, and docx.
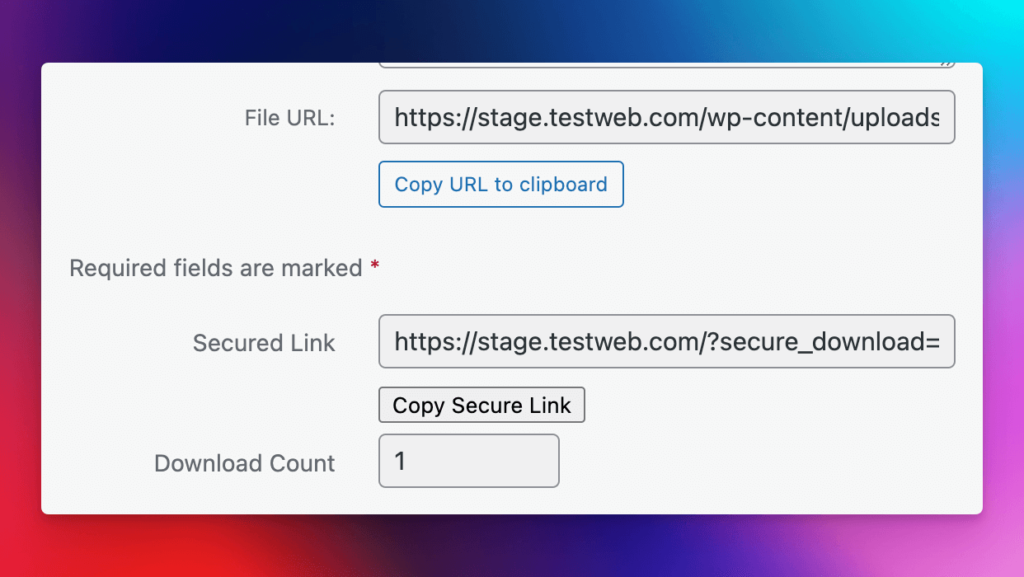
Example of a secure link in Media -> File preview. It also shows the downloads counter:
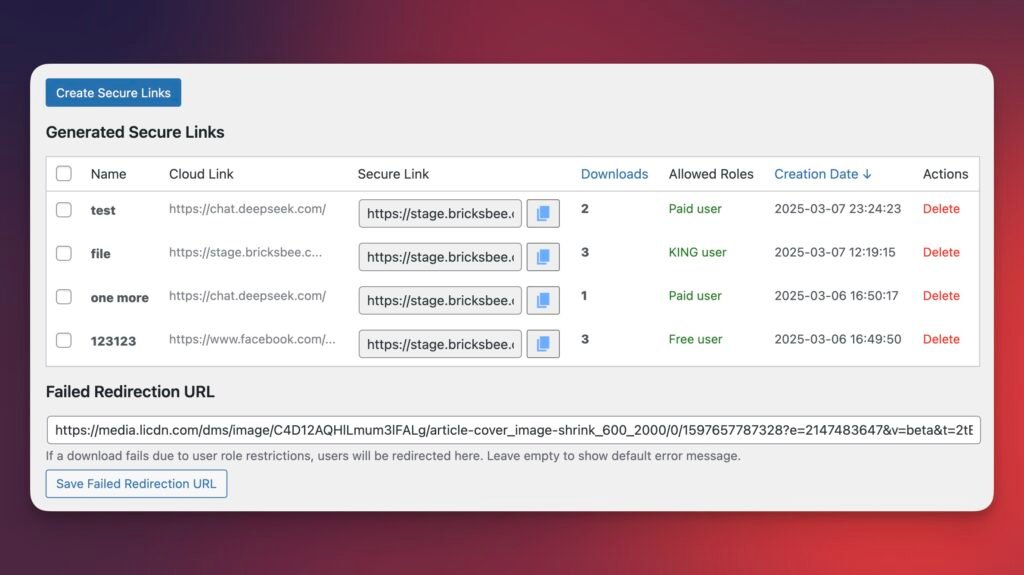
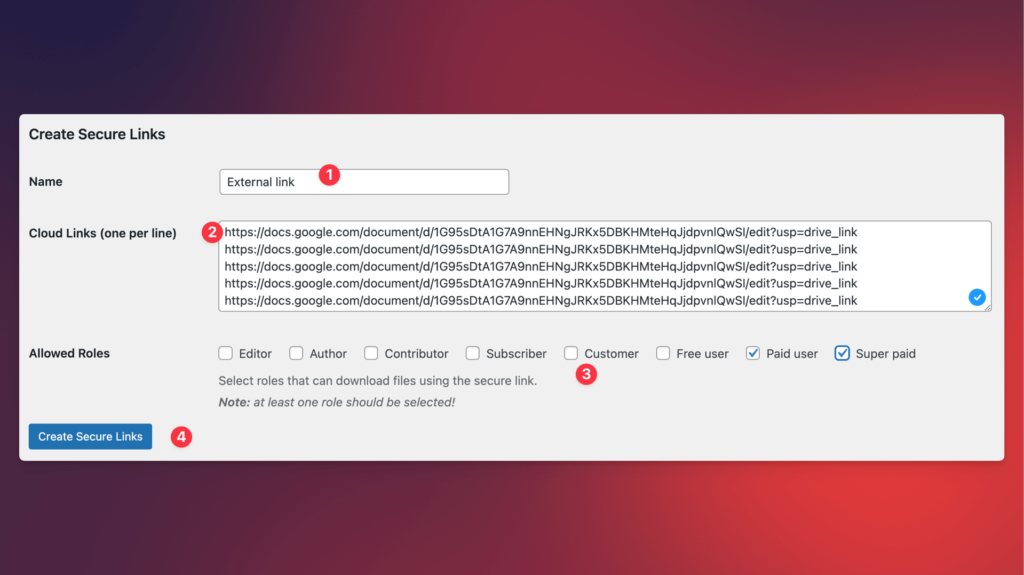
7. Secure links (external)
This is the feature that allows you to mask external/internal links. These links can be accessible for user roles set up during link creation.
You can do following things:
Note: secure external links available in KING version
Create an unlimited number of links. These can be any link: Google Drive, S3 bucket, Dropbox, or any other link starting with http:// or https://.
Advice: You can use this tool as a link tracking tool if you don't want to store content for downloading outside the WordPress website.
How to create secure links
8. Widgets
This widget has been added to your WordPress Dashboard to quickly check the main metrics from the RoleCommerce plugin.
Metrics in this widget:
Note: widget features available starting from KING version
These counters detect the user roles you've selected on the Role Manager page in the Free Users and Paid Users sections.
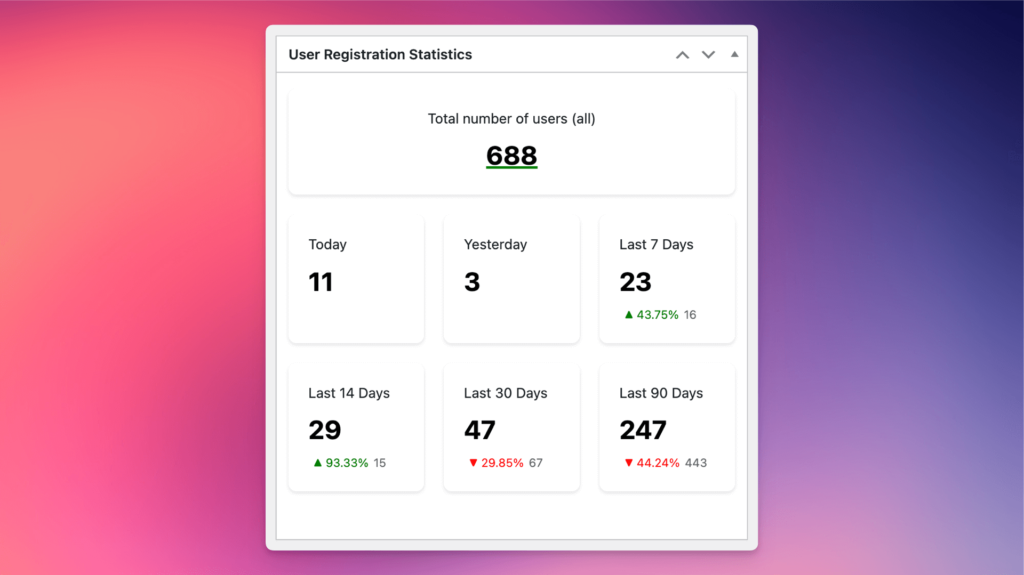
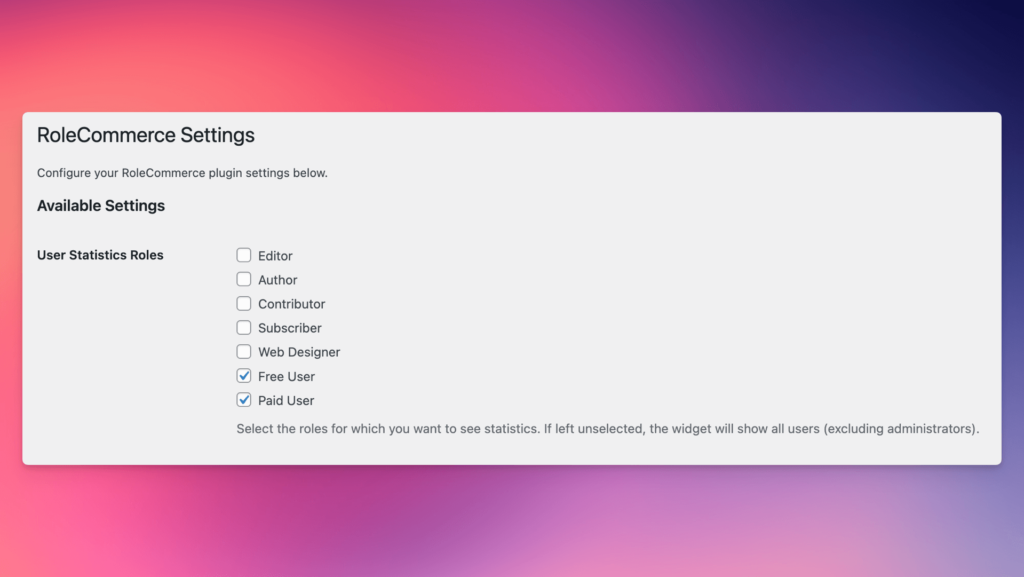
8.1 Widgets: User registration Statistics
This widget is added to your WordPress Dashboard when you select the user roles you want to see in the widget. The widget shows the total number of users in your database (excluding administrators and counting only the roles you've selected on the Settings page).
It also displays registration numbers for Today, Yesterday, Last 7 Days, Last 14 Days, Last 30 Days, and Last 90 Days, along with the Delta compared to the previous date range.
For example, the percentage below the number for the last 7 days is displayed based on the previous last 7 days.
Note: widget features available starting from KING version
How to select roles for this widget?
9. Security: Admin Autoremoval
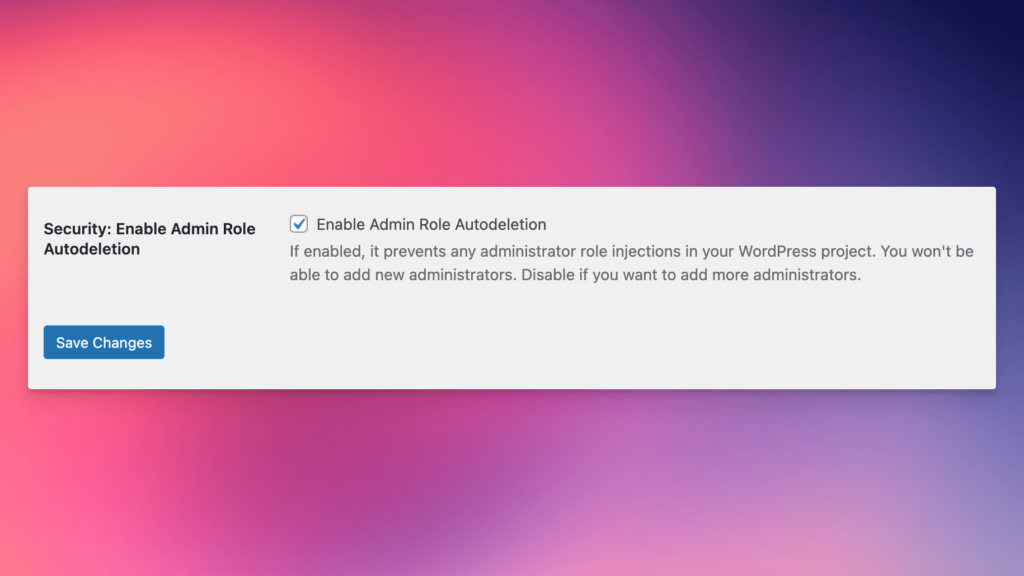
This is an incredible setting that will remove all unauthorized administrators. In other words, you can further secure your WordPress project from within.
Note: admin autoremoval available in KING version
Probably, you might have seen such injections on your Users page, where some administrators are listed, like eidnxj, jfihjeuc, ieriunc, etc.
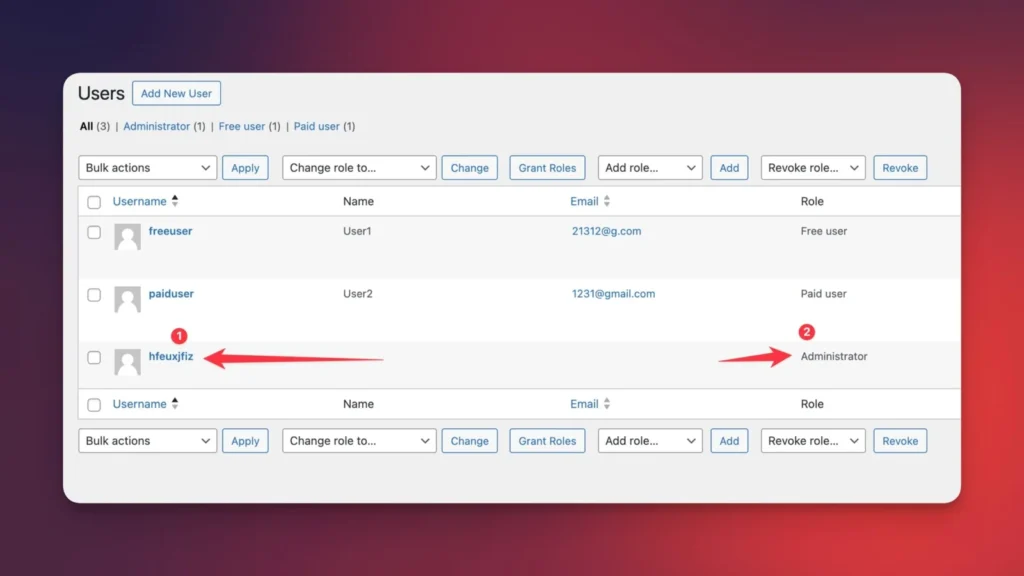
This setting, when enabled, will prevent the creation of any administrators. Even if an admin appears in the system, it will be immediately deleted.
Note: moreover, you won't be able to manually create a new administrator. That option will be removed as well. To create a new administrator, disable this setting, create a new admin, and then enable it again to make your website more secure.
10. Download Restrictions
NEW: check this part of tutorial how to build website with downloads restrictions:
This is a flexible setting which allows set up different # of allowed downloads per user role.
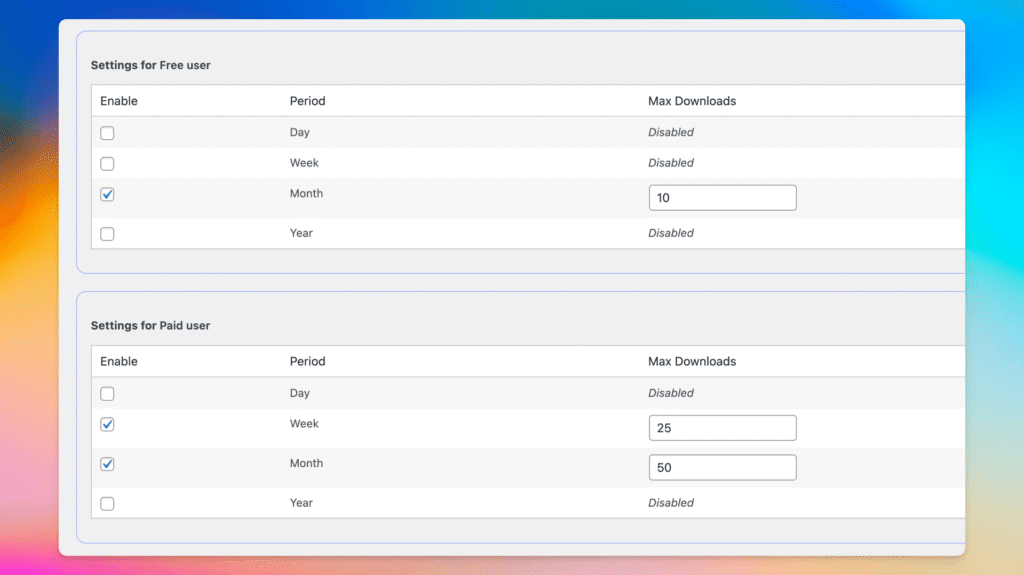
Available restrictions
Note: download restrictions available in KING version
First, go to RoleCommerce -> Settings -> Enable Download Restrictions
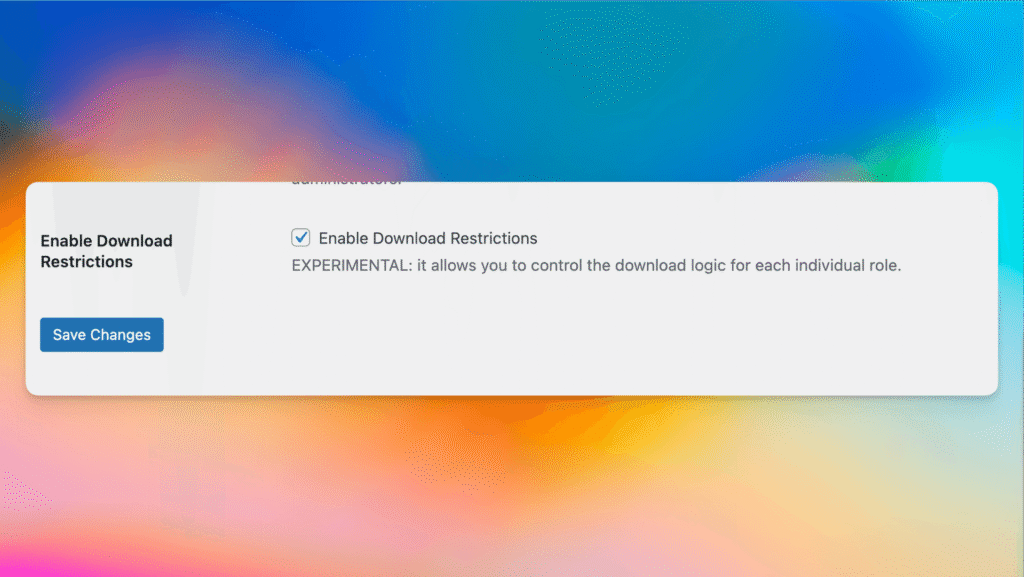
After that, you'll be able to see the new subpage called Downloads Logic. The setup is simple: select the roles from the list of checkboxes you want to restrict and click Save Changes.
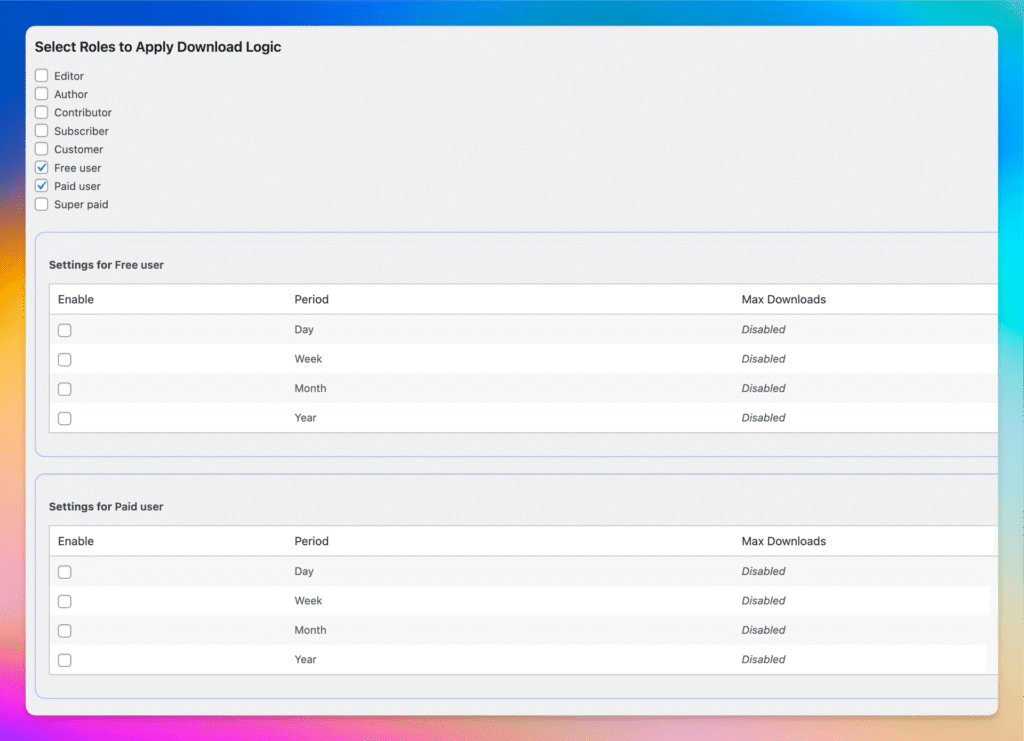
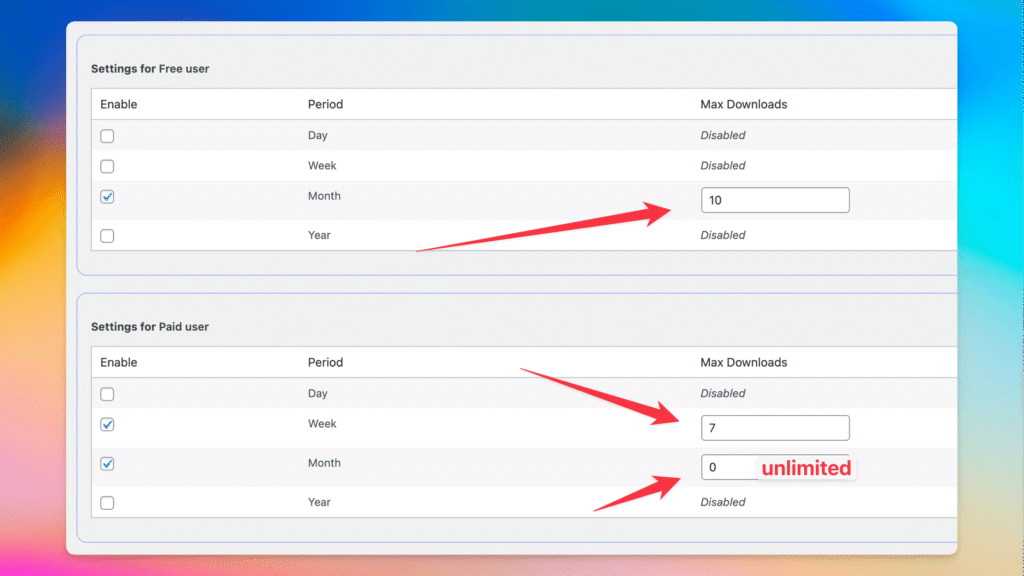
After that, click Enable on the checkbox related to the period (day/week/month/year) and click Save changes. Then you can set the limits per period of time. Use 0 to make it unlimited.
In your User Table, you can see the usage per user, and you have 4 buttons to reset limits per day, week, month, or year for a single user:

10.1. Display limits on UI
How to display usage limits on FrontEnd:
It will generate the text and the number of available downloads.
Example of generated information: Your download usage: 3 / 7 per week, 3 / ∞ per month
10.2 RC: user meta params
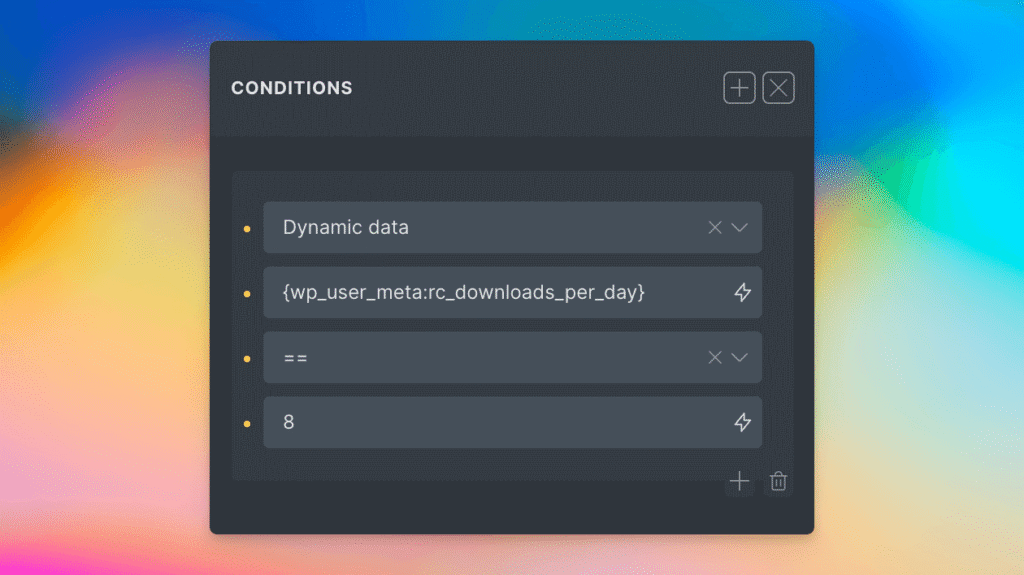
NEW Available user meta params:
The true power: you can use this param to build a logic around limitations.
Example: I set a daily limit of 8 downloads for paid users. When I use the user meta `rc_downloads_per_day = 8`, I can display information like "Limit reached. Upgrade" and hide the download button. Here is how it can be done with Bricks Builder:
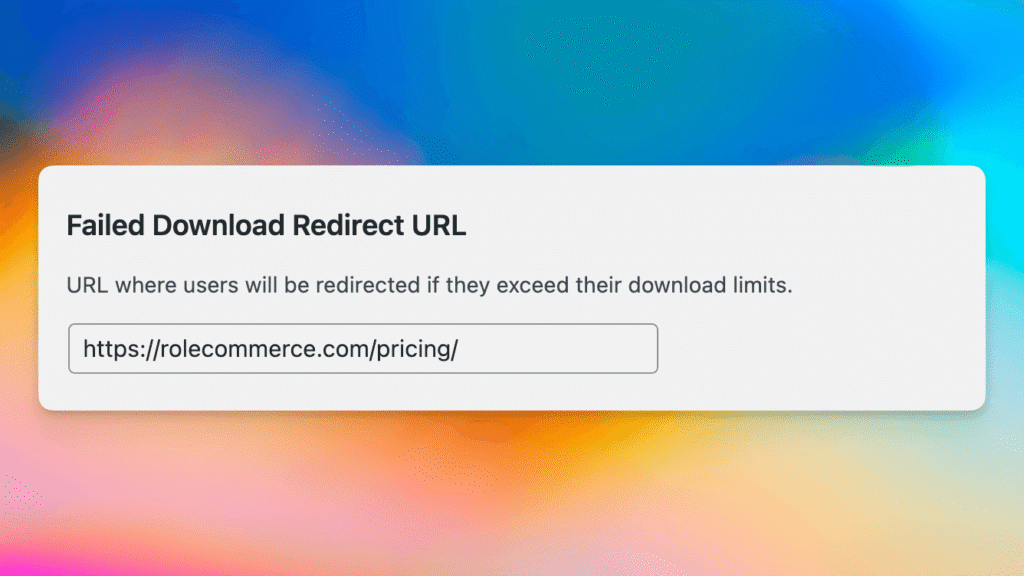
10.3 Failed Download Redirection URL
When the user doesn't have enough credits, the Failed Redirection URL rule will be used for this case. Check Secure Downloads or Secure External Links.
11. Hide your users (authors)
It's a great setting if you don't need to show your profile publicly and want to prevent any scraping of your user base. Sometimes, unexpected guests might gain access to the list of usernames or emails by visiting yourwebsite.com/author/username. If you don't implement the logic for displaying authors and their posts, it's better to enable this setting.
Example: If this setting is enabled and you try to visit the author page, you will be redirected to the homepage. It's a great additional security feature.
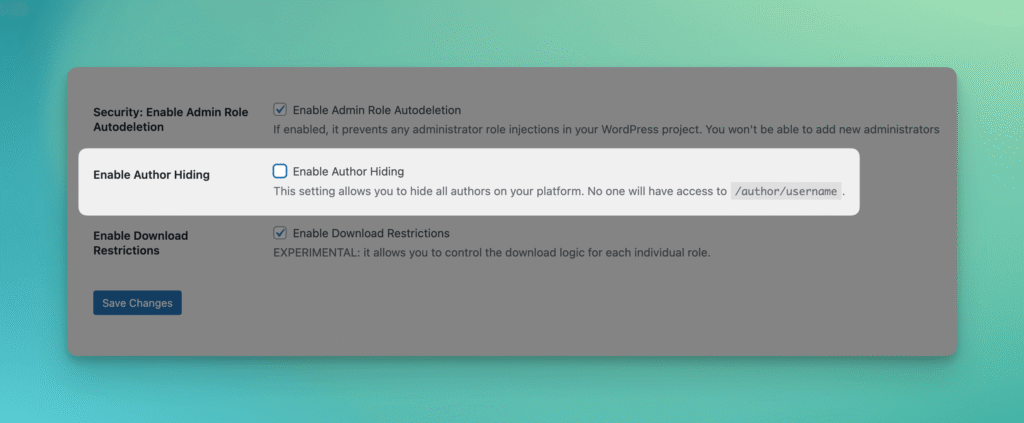
Note: author hiding available in KING version
12. Credits (experimental)
This is a feature that allows you to give credits to users based on their roles. In short, you're able to create different "packages" to sell credits that can be spent after performing certain actions. Currently, only download actions are supported via secure downloads and secure external links.
First, go to RoleCommerce -> Settings -> Enable Credits Logic
Note: author hiding available in KING version
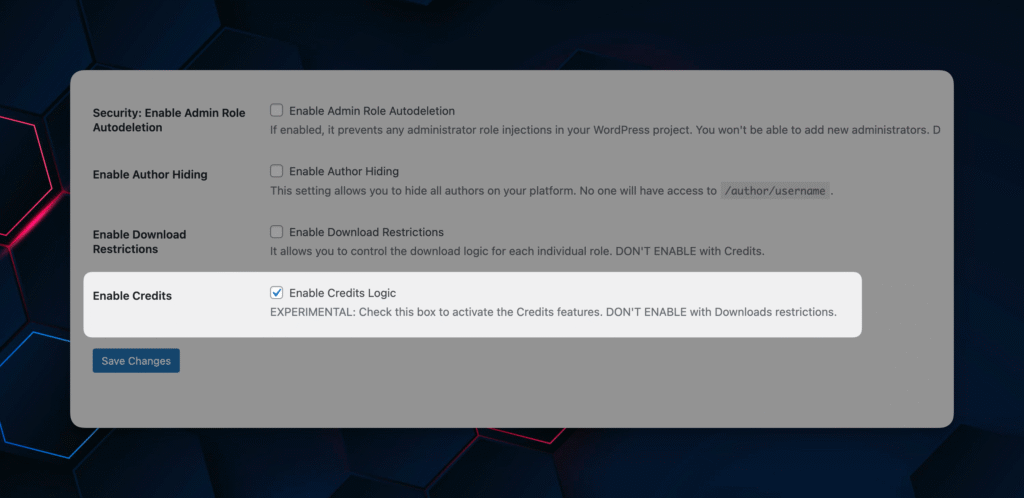
Note: Don't use Downloads Logic with Credits logic. It might cause conflicts or one of these features won't work.
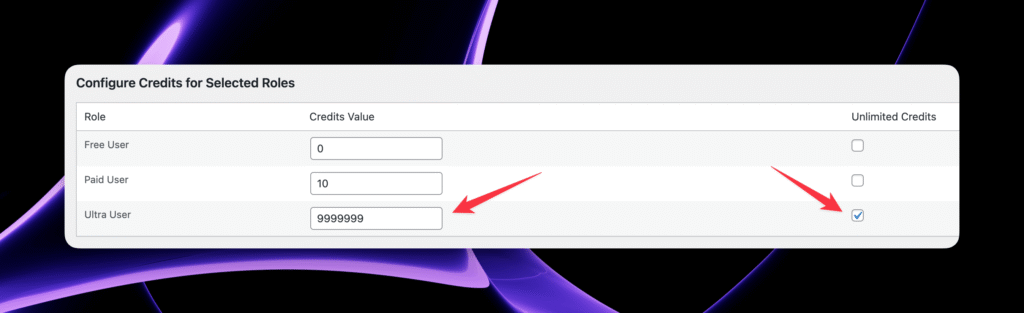
How to set up roles and credits?
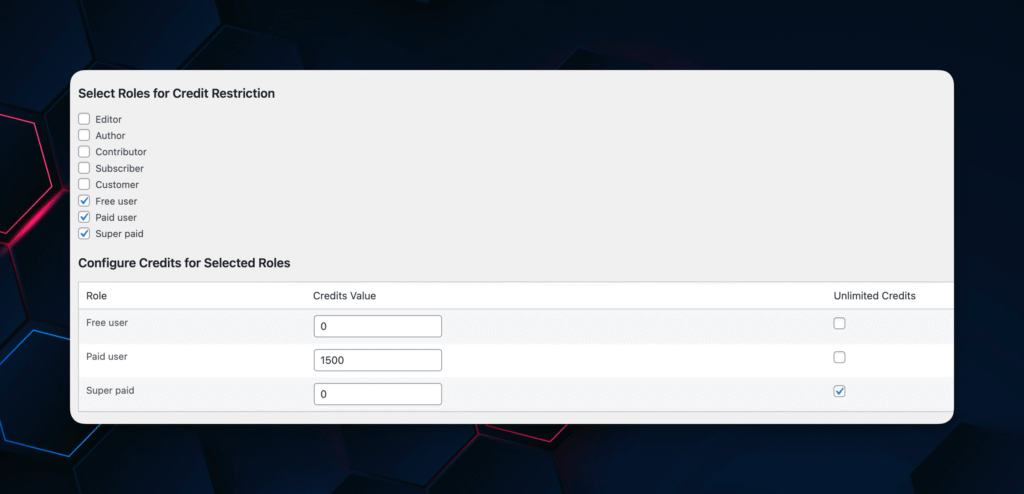
Example: When the user changes the role via our RoleCommerce links, this user will receive the amount of credits defined in the Credits value input field. For example, a paid user gets 1500 credits.
To set up Unlimited credits, define very big number like 9999999 and enable checkbox 'Unlimited'. In this case, the user balance won't be affected and he / she could download everything under 9999999 Credits.
12.1 Additional Credits settings
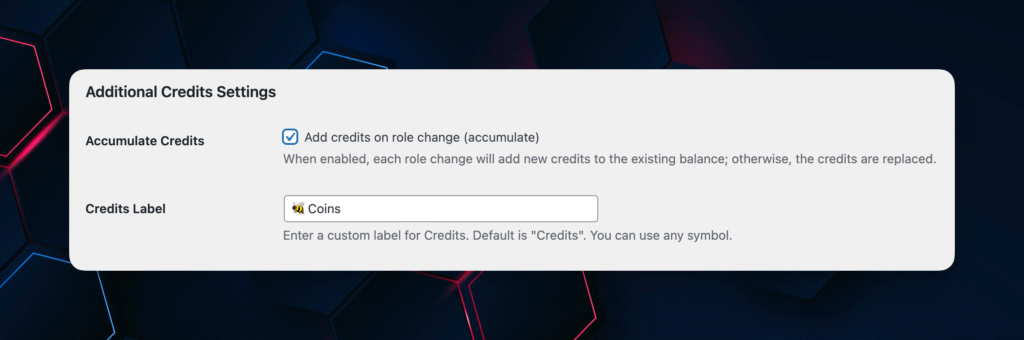
You can also enable the feature that will accumulate credits after changing the role (even the same role) repeatedly (like purchasing packages and having credits), or you can disable it. In this case, the user, after the role change, will only have the amount of credits defined in the settings.
To make this functionality more flexible, you can use any name for Credits to display for your visitors. For example: coins, gems, bees, carrots, or whatever else.
12.2 Secure links fees
This is the table with all secure links you have in your RoleCommerce and WordPress project (included secure downloads and secure external links).
On each individual link, you're able to set up credit costs that will be charged to the user account after a successful downloading process.
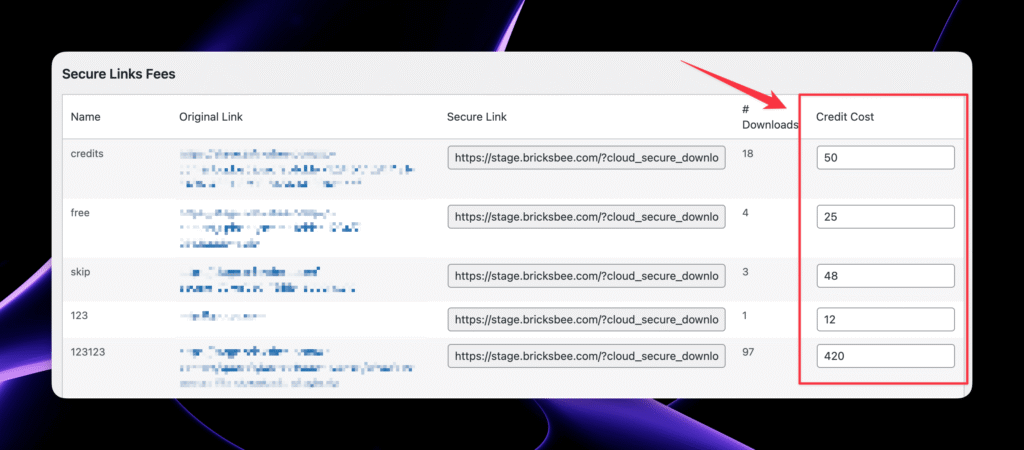
Example: User has 100 credits. The first file via a secure link costs 50 credits. After downloading this file, the user's balance will be 50 credits.
When the user doesn't have enough credits, the Failed Redirection URL rule will be used for this case. Check Secure Downloads or Secure External Links.
12.3 RC Credits: user meta params
Credits as data are stored under the new meta param rc_credits_value. It means, you're able to build the logic in your page builder across this param
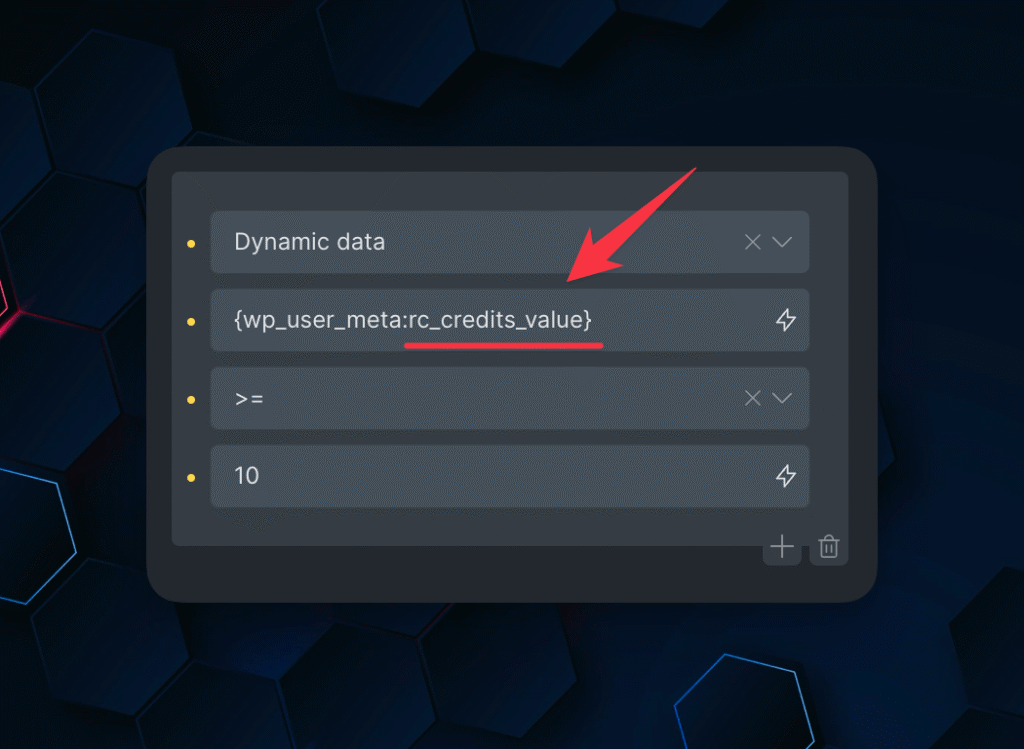
Example: On the screenshot above, you can see, that some elements will be rendered IF the credits of the users (rc_credits_value) equal or bigger than 10.
12.4. Display Credits on UI
It will render the information about current amount of Credits with defined label on the user level:
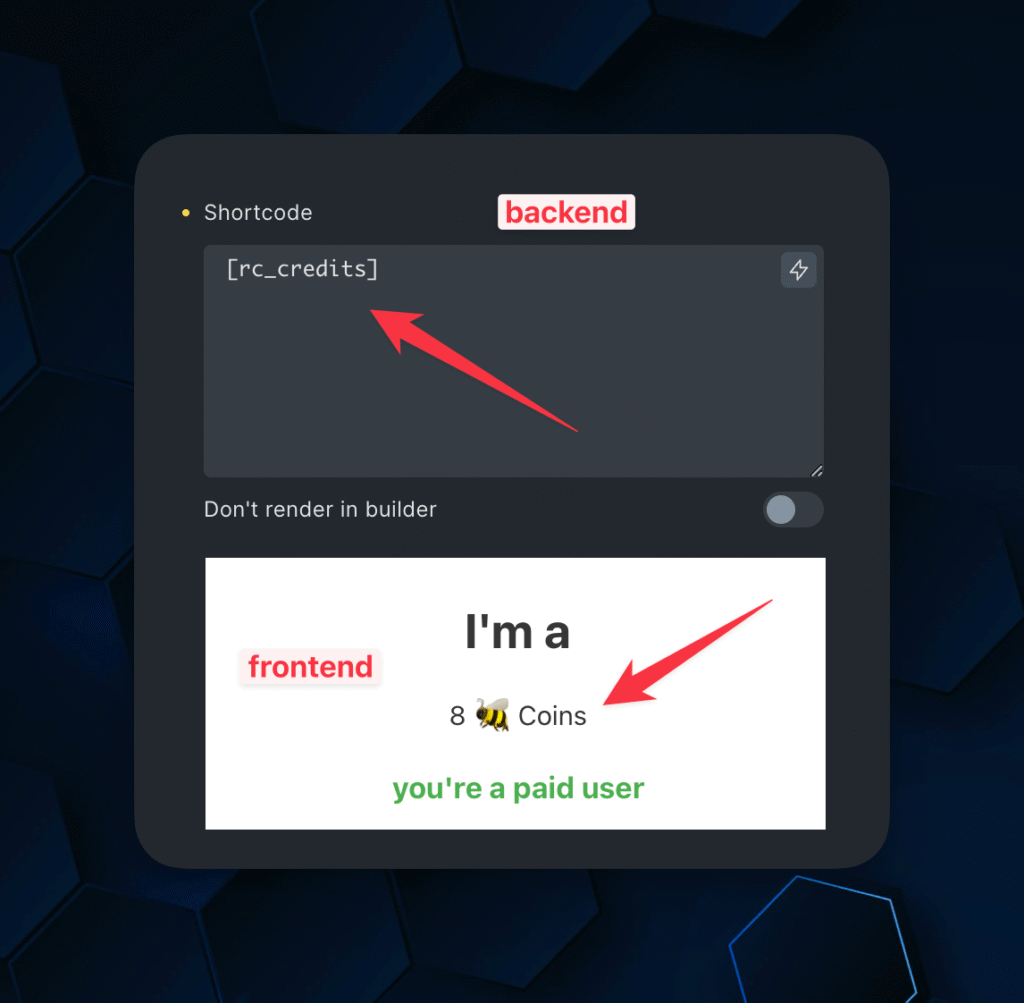
How to display usage limits on FrontEnd:
Example 152 Credits or Unlimited credits (depends on what you've set up)
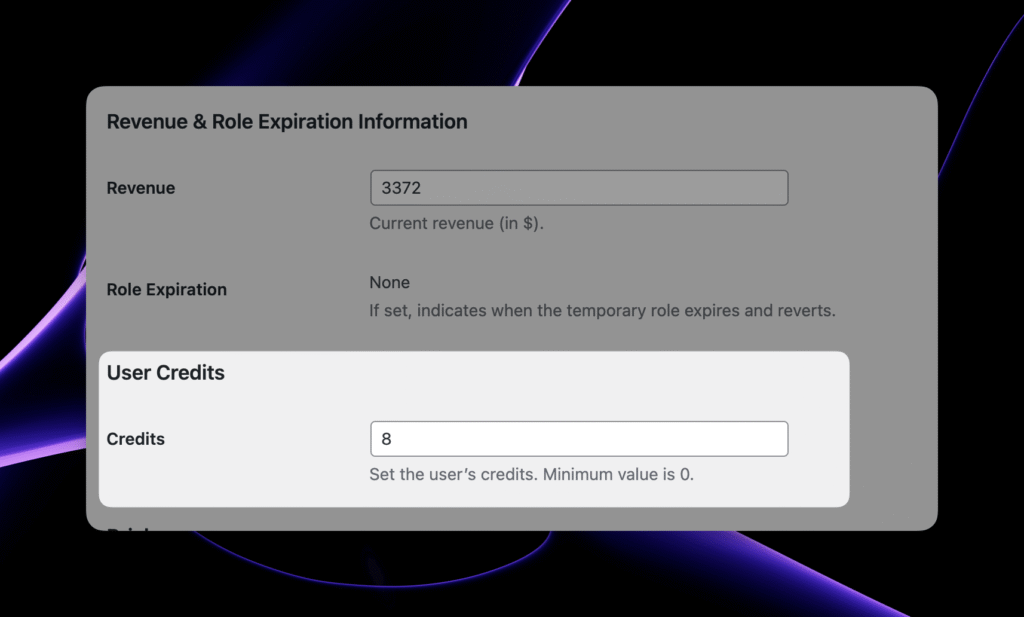
12.5. Manage user credits as an admin
As an admin, you can see the number of credits per user, with the ability to manually input a new credits value if needed:
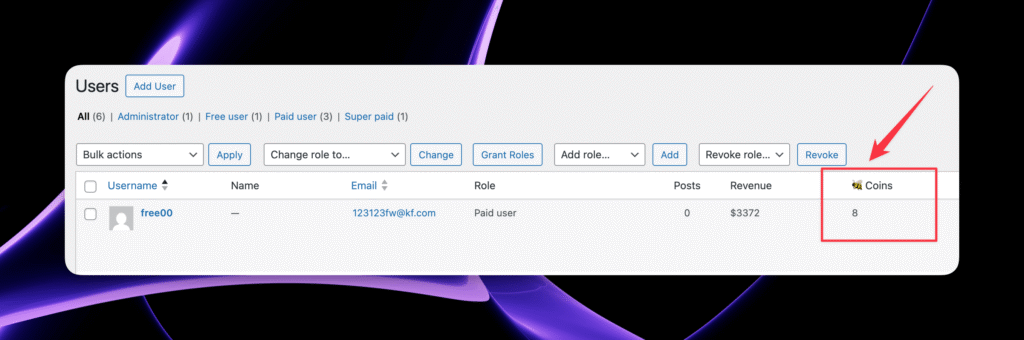
When you open the User Edit page, you can see the new field has been created: